

The very first question which my clients ask is, “Will my users be able to download the app from Google Play or Apple App Store?”
Well, traditionally the answer to this question was a no, but things had changed completely when Google updated the Chrome to version 72 which introduced TWA (Trusted Web Activities).
TWA is an entirely new way to integrate the content of your web app with the Android app using a protocol based on Custom Tabs.
I will explain to you the step-by-step process to publish your PWA app on the Google Play Store.
To setup TWA you don’t need to write any Java code. You require the Android Studio.
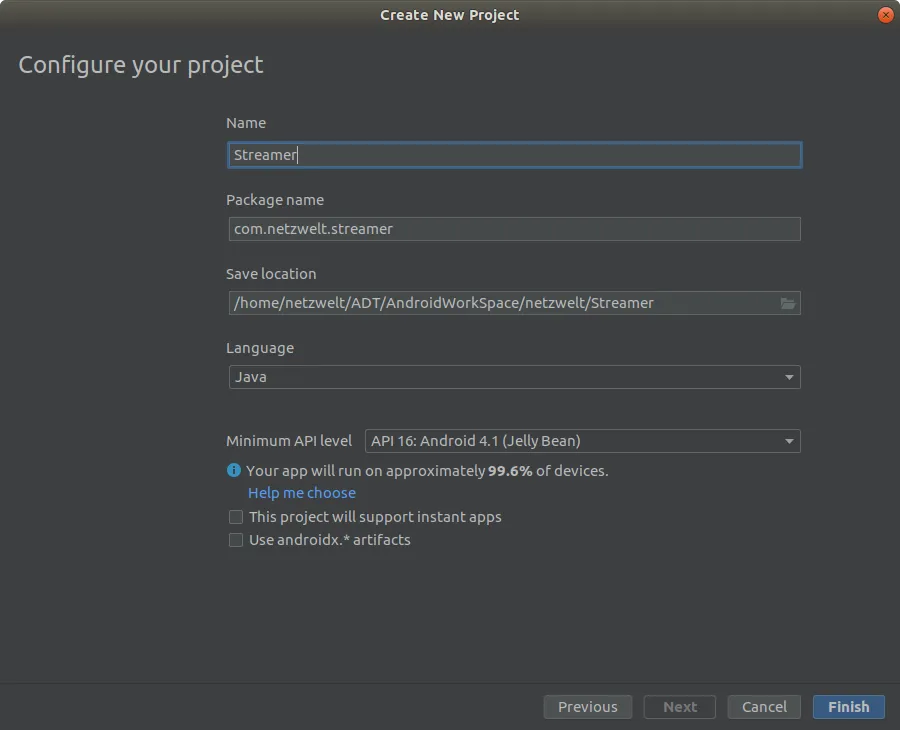
So first, you need to create a new project. Launch Android Studio and click on “Start a new Android Studio project.”
After that, choose the option “Add No Activity,” which will allow us to configure the project.
The configuration is pretty simple, so let’s get started –
Name - Here, you will add the name of the application.
Package name - The package name is an identifier for your Android app on the Google Play Store. The package name must be unique.
Save location - It is just the path where you want your files to exist locally.
Language - You can keep it at default, i.e., Java as the app is already written.
Minimum API level - We are covering this in the next step. Let’s select API 19 for now.
Rest leave the checkboxes unchecked and click on Finish.
Add support library to TWA by modifying two files in the project directory Gradle Scripts.

Next, you need to add a Git package manager. It eases the process of publishing our web app. For the sake of this example, we will be using JitPack.
JitPack is very robust and made explicitly for Android apps although it is paid but definitely worth the cost if you are publishing your PWA app on the Play Store for the very first time.
The next step is to connect your project with JitPack. Open the support library build.gradle (Project: VTNetzwelt) and add the following code –
It tells the project to look at JitPack for the app repository.
Now open build.gradle file and add the required dependencies to the project –
As TWA library uses the features of Java 8, so the next step is to enable Java 8 –
Next step is to define the app name, the location where the app is hosted and the default URL –
There is an AndroidManifest.xml file for every Android app which provides all the essential information about the app such as package information, device compatibility, etc. which helps Google Play display app requirements on Play Store.
The first thing that needs to be addressed in this file is Activity. It implements the user interface and is required in TWA.
Open the manifest file and replace the existing package name with your application ID.
Now add the TWA activity by adding tag inside the tag –
Next step is to establish a connection between the Android app and the PWA. For this, we need to use Digital Asset Links.
The connection needs to be established on both ends = TWA (application) and PWA (website).
To establish the connection, we need to add assetStatements in our manifestPlaceholders file. It will hold the information about the PWA.
Next, we add a meta-data tag into our application tag. The tag informs the Android app to establish a connection with the app specified in manifestPlaceholders.
Now we need to establish the connection in the opposite direction. Create a .json file that will be available in the app / .well-known/assetlinks.json path. The file can be created using Android Studio.
To generate the file, three values are required –
Hosting site domain - It is the URL of our PWA site
App package name - This is the name of our TWA package
App package fingerprint (SHA256) -It is a unique cryptographic hash generated based on Google Play Store keystore.
We can create the app package fingerprint using Android Studio.
In the Android Studio, go to –
Build – Generate Signed Bundle
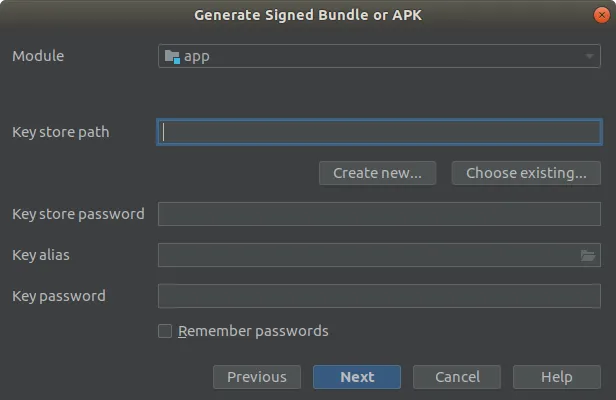
Now go to “Create new…” in keystorepath.
Fill out the complete form and be sure to remember the complete credentials.
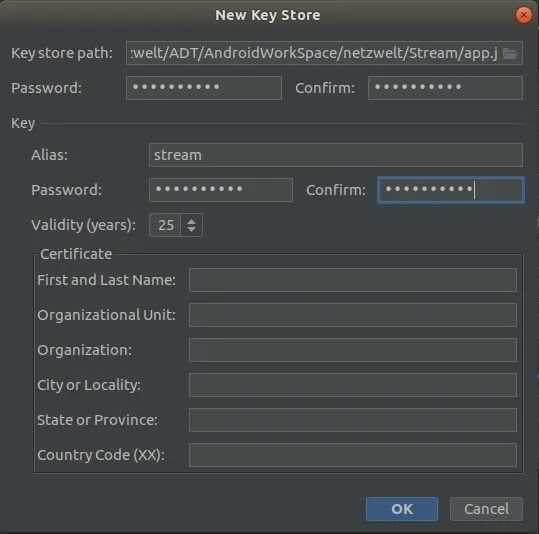
It will create the keystore file. It is a critical file as it is your proof that you are the owner of the application. If the file gets lost, then you will not be able to push any updates to your application in the store.
Next, we need to select the type of bundle. We will be choosing “release” as it gives us a production bundle.
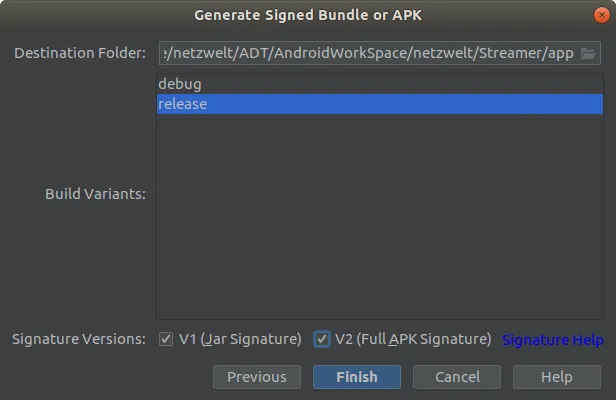
It will generate our APK.
Now head back to Android Studio –
Go to Tools – App Links Assistant
It will show you the required steps to create a relationship between the application and the website.
Go to “Declare Website Association” and fill the Site domain and Application ID.
Select the keystore file which we generated in the previous step.
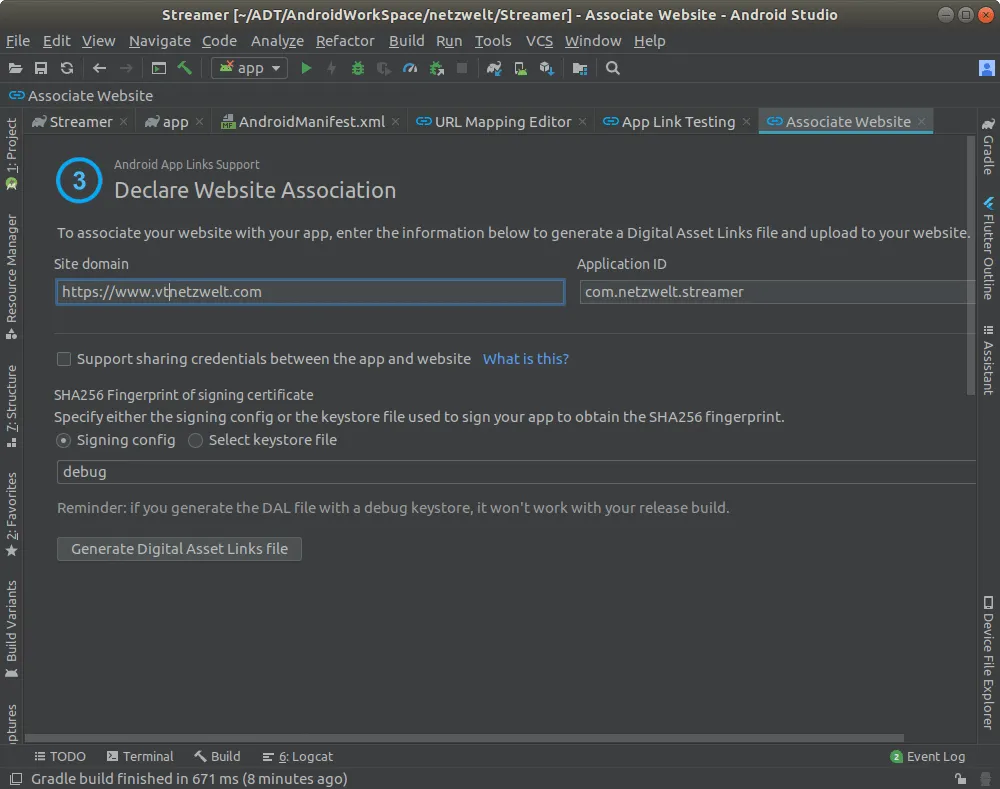
After filling out all the details, cock on the button – “Generate Digital Asset Links file,” which will generate assetlinks.json file.
The file will look something like this –
Now, this file needs to be available in our app’s path, i.e., / .well-known/assetlinks.json.
To test the connection, you can click on the “Link and Verify” button.

If the message is a success, then Congratulations as you have successfully established a connection between the Android app and the PWA.
Before publishing your app to the Google Play, certain assets are required. It includes –
Progressive Web App development offers faster solutions for a faster world. Progressive Web Apps deliver faster, reliable, and seamless experience while maintaining secured performance.
We are one of the leading PWA development company offering highly experienced PWA developers to build PWA apps that offer native app experience.
We deliver sophisticated Progressive Web Apps with features including offline browsing, push notifications, etc. with our custom Progressive Web App development.
To set up a Trusted Web Activity (TWA), start by creating a digital asset link file and associating your web app with your Android app using the same asset key. Next, configure your AndroidManifest.xml to define the TWA properties, including the URL of your web app. Finally, build and deploy your Android app, ensuring that it meets the requirements for TWA compatibility, such as using HTTPS and adhering to content security policies.
Hire our experienced PWA developers to build fast, reliable, and engaging progressive web applications. Our team leverages the latest technologies to create seamless, offline-capable experiences across all devices. Partner with us to enhance your web presence and achieve your business objectives with cutting-edge PWA solutions.
There is an AndroidManifest.xml file for every Android app which provides all the essential information about the app such as package information, device compatibility, etc. which helps Google Play display app requirements on Play Store. The first thing that needs to be addressed in this file is Activity. It implements the user interface and is required in TWA. Open the manifest file and replace the existing package name with your application ID.
To publish your app to Google Play, first, create a developer account on the Google Play Console. Next, prepare your app by ensuring it meets Google’s guidelines, and then upload the APK or AAB file, along with relevant assets and metadata. Finally, set pricing and distribution preferences, review and submit your app for review, and once approved, it will be available on the Google Play Store.
Are You Prepared for Digital Transformation?
Mobile App Development
How much does Flutter app development cost in the USA in 2026? See real price ranges, app category costs, and US pricing for startups and enterprises.
Mobile App Development
Planning to hire Android developers? This guide covers costs, skills, hiring models, and common mistakes to help you build apps that last.
Healthcare
Building a telehealth app isn’t just coding video calls. It’s about secure, compliant, and user-friendly care platforms. Learn features, costs, and real-world tips to build smarter telemedicine apps.